Fast vs Extra-Fast Inshore Rods: Which Action Is Better for Jigs, Paddletails and Live Bait?
I start with fast action for one versatile inshore rod. I consider extra-fast for a dedicated single-hook outfit when I want a particular blank’s direct response for bottom contact or precise lure movement. For treble-hook plugs and some live-bait methods, I also consider moderate-fast. I choose from the hook, complete lure weight, line and drag before treating an action label as an upgrade.
My decision begins with a change in presentation. If I switch from hopping a jig along shell to swimming a paddletail over grass, then finish with live shrimp, I have changed the job three times. The same crisp response that helps one movement may make another less forgiving.
Should I choose fast or extra-fast for inshore fishing?
I choose fast action as my starting point for mixed inshore artificials, including paddletails, exposed jigheads and spoons. I consider extra-fast when a specific single-hook presentation benefits from a particular rod’s more concentrated tip bend. For treble-hook plugs or delicate live bait, I also assess moderate-fast rather than forcing either choice.
| My dominant presentation | My starting action | My deciding check |
|---|---|---|
| Mixed artificials on one outfit | Fast | Loading and control across my normal lure weights |
| Swimming a paddletail on an exposed jighead | Fast | Consistent retrieve and controlled engagement |
| Hopping bottom-contact plastics | Fast or extra-fast | Contact, manageable slack and useful tip response |
| Weedless plastic on a stout single hook | Firm fast or extra-fast | Suitable power, clear hook gap and collapsible plastic |
| Walking topwater with trebles | Fast or moderate-fast | Working cadence plus cushioning during the fight |
| Live shrimp or finfish on a circle hook | Fast or moderate-fast to start | Smooth casting and steady-pressure engagement |
I use this matrix as practical starting points, not a ranking of every blank. The question behind fast vs extra fast rod inshore fishing is which response suits my presentation, not which label sounds more advanced.
What is the difference between fast and extra-fast rod action?
I use action to describe how bend is distributed along a loaded blank. An extra-fast design generally concentrates its initial bend closer to the tip than a fast design. I treat those labels as relative descriptions, because the actual curve depends on the model, load, support position and construction.
I keep five terms separate:
| Term | What I am evaluating | What it does not establish |
|---|---|---|
| Action | Distribution of bend under load | Power or measured recovery time |
| Power | Resistance to bending | Where the bend concentrates |
| Taper | Changes in blank geometry and construction along its length | A complete performance prediction |
| Recovery | Return motion and settling after deflection | Bite-detection ability by itself |
| Sensitivity | Useful feedback through the complete outfit | A universal property of F or XF lettering |
Daiwa distinguishes action from blank recovery. Its explanation makes an important point for my selection: two rods with the same action can return from deflection differently.
I compare medium versus medium-heavy inshore power separately. A medium extra-fast rod does not become a more powerful rod merely because its initial bend occupies a shorter section.
I do not treat bend percentages as standards
The often-repeated ranges of upper 25–30% for fast and upper 15–20% for extra-fast are, at best, rough teaching shorthand unless a manufacturer supplies a measurement method. They are not exact transition boundaries I can assign to an unknown rod.
A blank does not bend at a hinge and remain rigid everywhere below it. More load can engage more of the blank. A fast rod is not automatically parabolic, either.
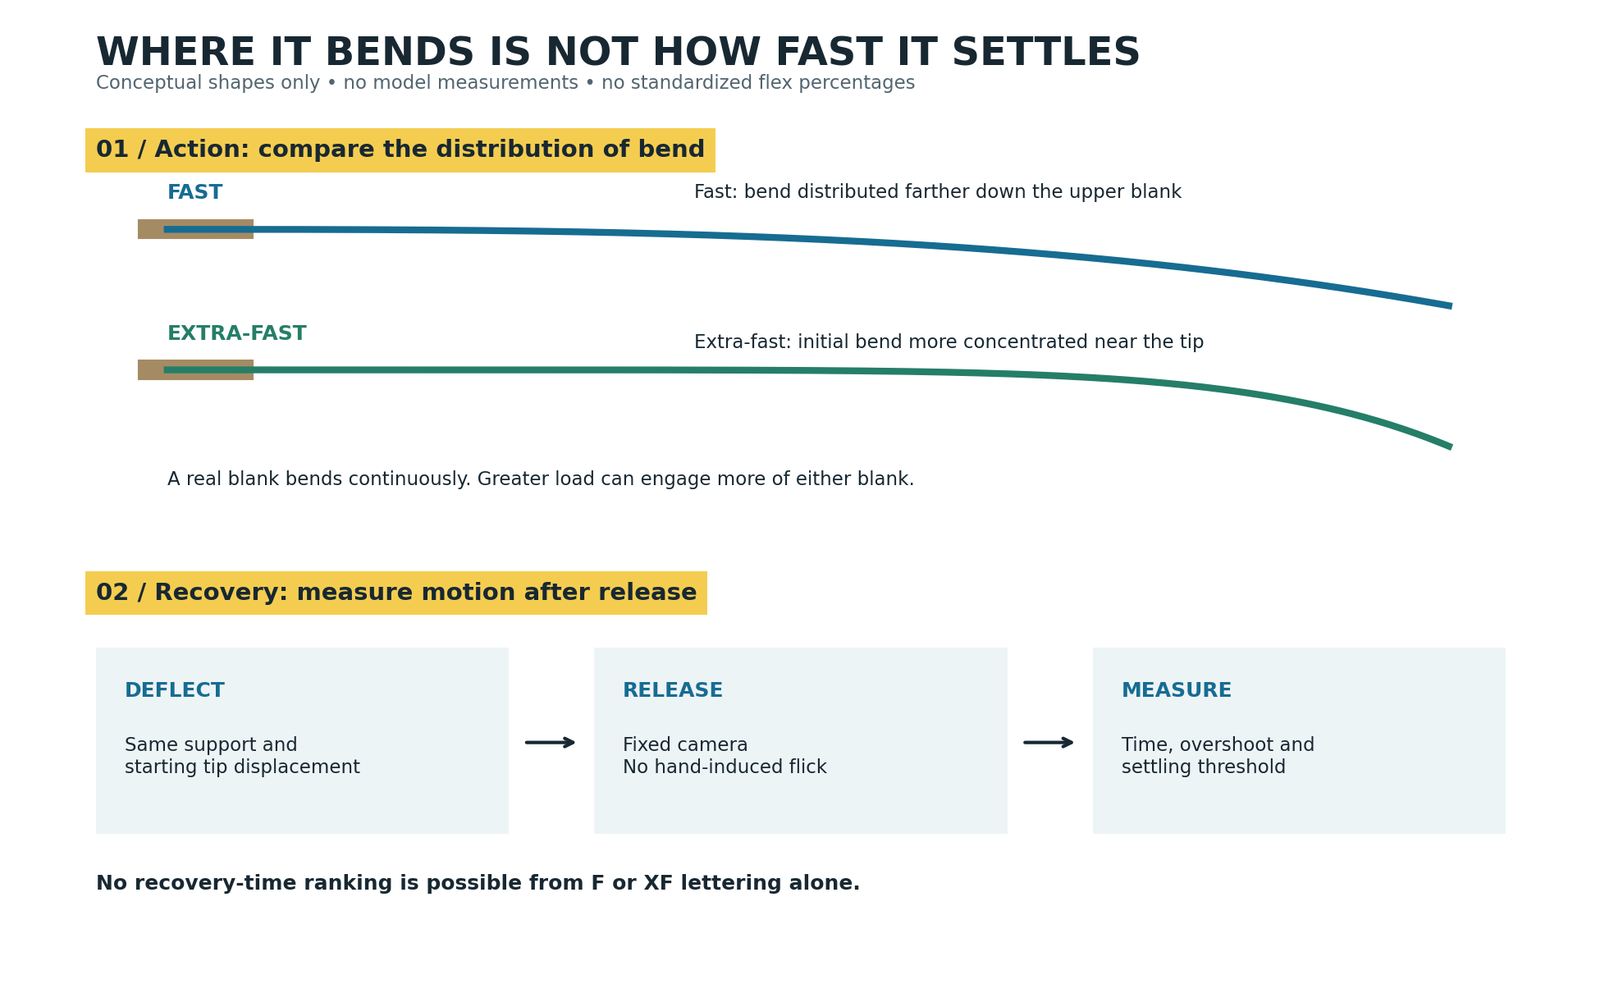
Bend location. Recovery time. Two different questions.
I compare the loaded shape first, then measure return motion separately.
01 / Static action
I keep the support and load consistent and record the whole blank, not only its tip.
02 / Dynamic recovery
I define the starting deflection and measure first return, overshoot and settling separately.
These are conceptual shapes. They are not measured curves or standardized bend percentages.
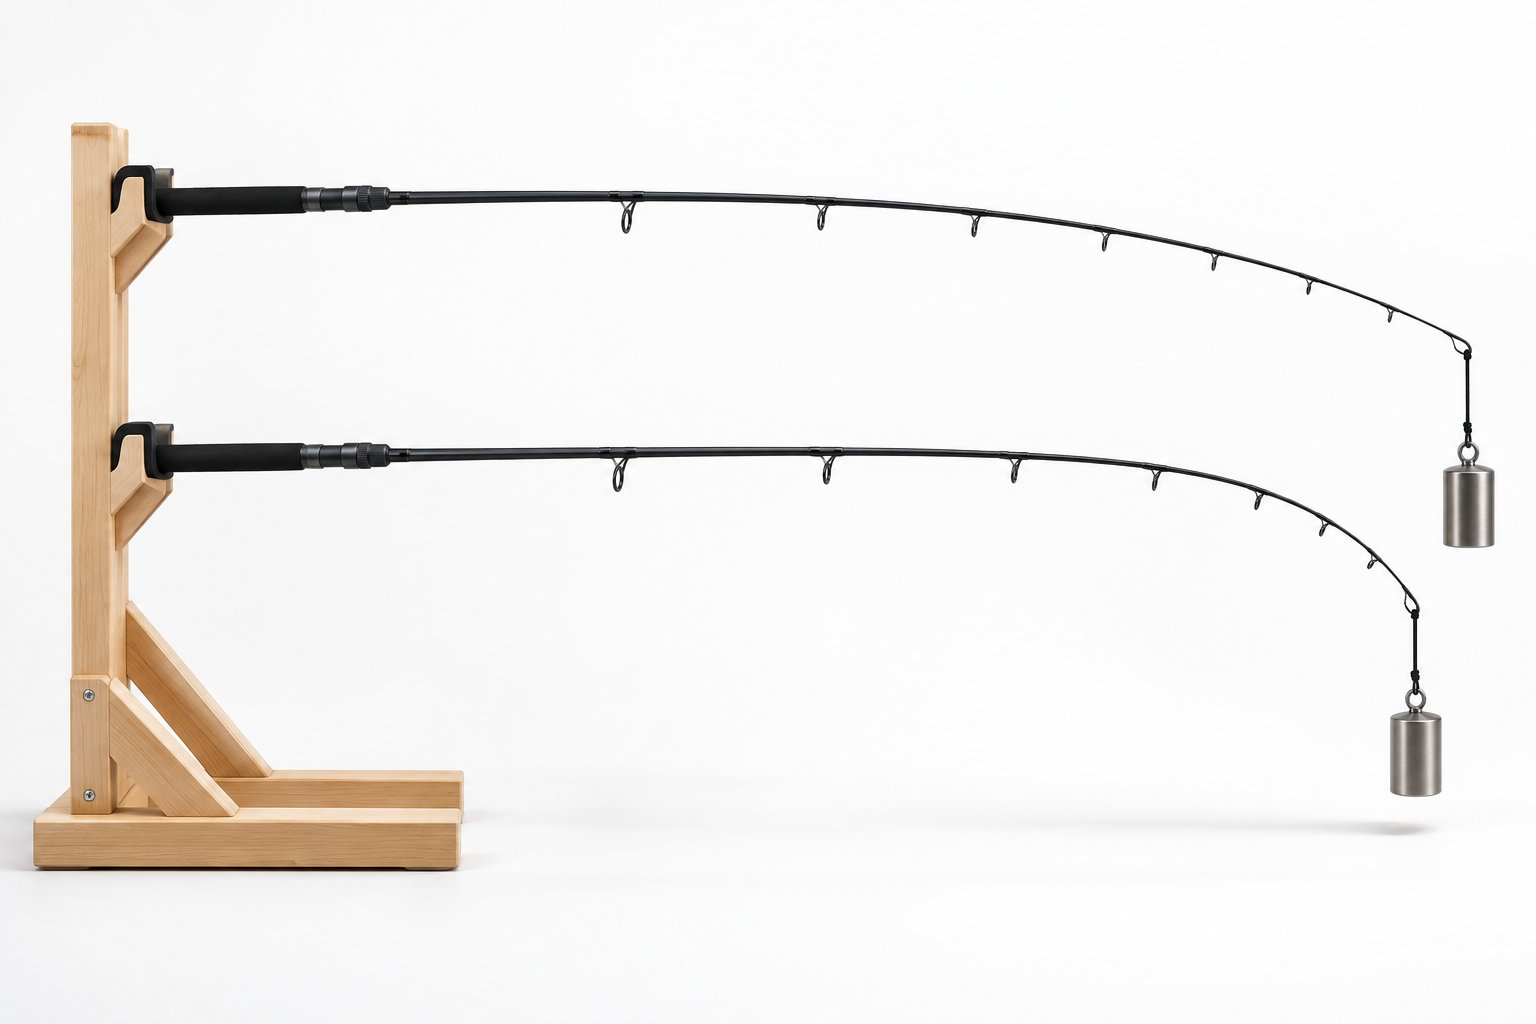
What would a 2-, 4- and 8-ounce flex-board test show?
Those masses can define test inputs. They cannot generate the missing rod measurements.
| Suspended mass, excluding any uncounted hanger | Approximate gravitational force | What I would record |
|---|---|---|
| 2 oz / 56.70 g | 0.556 N | Full blank shape and tip displacement |
| 4 oz / 113.40 g | 1.112 N | Change in bend distribution |
| 8 oz / 226.80 g | 2.224 N | Further loading response, only if appropriate for the fixture and rod |
I calculated force as mass × standard gravity. These are not safe-load approvals or published deflection results. I would use a suitable fixture, follow the manufacturer’s limits and include the hanger’s mass. I would never equate an 8-ounce suspended test mass with permission to cast an 8-ounce lure.
Is extra-fast more sensitive, and does its tip recover faster?
I cannot rank sensitivity or recovery from action alone. I assess rod mass, balance, construction, guide train, handle contact and line tension, then compare actual rods. Extra-fast may provide the response I prefer for contact work, but a fast rod can recover quickly and communicate a bite clearly too.
I separate three sensations: a change in line tension, visible tip movement and vibration reaching my hand. A wind-driven belly in the braid can interrupt contact before the blank has any useful signal to transmit.
Claims about high-modulus carbon, scrim or graphite strain energy need similar care. I want the actual material and layup described. Fibre stiffness does not, on its own, tell me the finished rod’s mass, damping, durability or sensitivity. Scrim is a reinforcement detail, not another name for extra-fast action.
| Comparison requested | What I need before publishing a number |
|---|---|
| Tip recovery speed | Fixed-camera footage, defined starting deflection and measured time |
| Oscillation damping | Successive oscillation amplitudes and a stated settling threshold |
| Casting distance | Repeated casts with matched reel, line and weighed lure |
| Sensitivity preference | Comparable conditions and preferably blind handling |
| Bait survival | A defined endpoint and controlled bait handling, rigging and casting |
I would report first return to straight and settling time separately. A tip can cross its resting position quickly and continue oscillating. I do not substitute a showroom wiggle for either measurement.
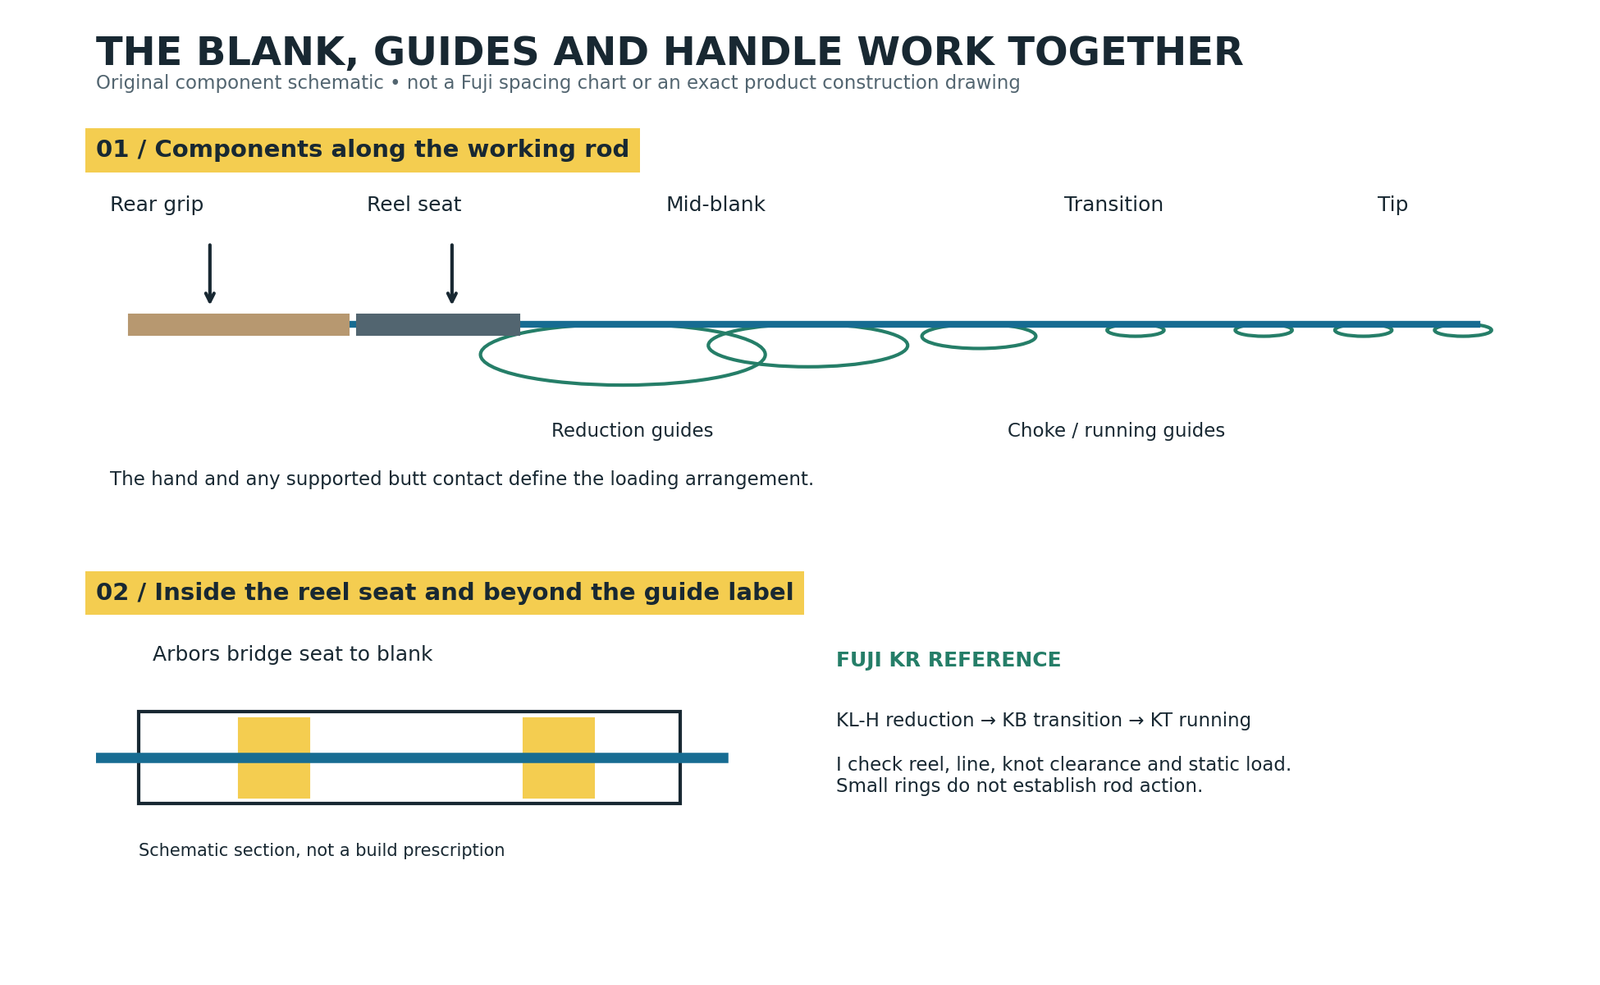
I inspect the components around the blank
On a Fuji KR layout, the reference sequence uses KL-H reduction guides, KB transition guides and KT running guides. I consult the Fuji KR guide-set information and placement calculator as starting references, then verify the actual build under load and in casting.
I check knot clearance through smaller rings. I also inspect reel-seat fit, arbors, grip position and supported butt contact. Small guides or a particular choke position do not establish the blank’s action.
The blank is only part of the outfit.
I inspect the guide train, grip and reel-seat connection alongside the taper.
01 / Tip and transition
Initial bend distribution changes with load. The transition is not a hinge or fixed percentage boundary.
02 / Reduction and running guides
Fuji KR references use KL-H reduction, KB transition and KT running guides. Actual spacing requires verification.
03 / Reel seat and arbors
Arbors support the seat around the blank. I check fit and the assembled grip rather than inferring sensitivity from appearance.
04 / Rear grip and contact
My hands and any supported butt contact define the loading arrangement. The butt cap is not always a fixed fulcrum.
Which action is better for jigs and paddletails?
I start with fast for exposed jigheads and steady-swimming paddletails. I compare extra-fast when precise bottom hops or a weedless single-hook presentation creates a specific need for different load transfer. My choice still depends on complete lure weight, hook-wire gauge, point exposure, line contact and the rod’s power.
Swimming over grass versus hopping along shell
For a steady retrieve above grass, I want to maintain depth and recognize a change in resistance. Fast already gives me a useful starting point. I have no reason to demand extra-fast merely because the lure has a paddle tail.
For short hops along shell, I want each hand movement to produce a controlled lure movement. I would compare both actions with the same jig and reel. If one blank feels vague, I would check slack, lure weight and wind before blaming the letter printed on it.
My habitat decision belongs alongside redfish structure and presentation choices. Changing from open grass to a shell edge can change the contact I need without changing the target species.
Exposed jighead versus weedless hook
An exposed point does not have to emerge through a plastic body before contacting the fish. With a weedless rig, I check that the plastic can collapse and leave adequate hook gap. A buried point, blunt hook or oversized plastic can defeat an otherwise suitable outfit.
| Hook arrangement | My first check | My action starting point |
|---|---|---|
| Exposed light-wire jig hook | Point condition and controlled pressure | Fast |
| Exposed heavier-wire jig hook | Power, drag and wire gauge | Fast or extra-fast |
| Weedless weighted hook | Plastic collapse and usable gap | Firm fast or suitable extra-fast |
| Small single-hook spoon | Complete lure weight and hook size | Fast |
I do not describe a jig hook as being driven through a redfish’s crushing plate. That is not a reliable anatomical model for ordinary mouth hooking. I focus on point contact, orientation and the load required by the actual hook.
My hookset begins with contact
I recover excess slack before applying a controlled set suited to the hook. A violent snap into slack creates a different loading event from a smooth pull on an already connected line.
At distance, line belly, stretch, drag slip and blank movement all affect how tension develops. Extra-fast does not make the process instantaneous.
Which action works best for topwaters and treble-hook plugs?
I usually compare fast and moderate-fast for treble-hook plugs. I want enough control to work the lure, together with useful cushioning after the fish loads the outfit. Extra-fast can work, but I would assess the exact rod, hook wire, line and drag before choosing it for a dedicated treble-hook setup.
A walking bait presents two separate jobs. I need controlled pulses during the retrieve, then steady tension during the fight. The action that feels sharpest while walking the plug may not be my easiest choice during a close head shake.
If a large trout rolls beside the boat with a plug hanging from its mouth, I avoid adding repeated hard strikes. I want bend and drag to accommodate the movement. I also check hook condition and how securely the fish is hooked.
My adjustment sequence is:
- Check hook points, damaged hardware and excessive drag.
- Reduce abrupt rod movements once the fish is connected.
- Maintain useful tension without locking the outfit rigid.
- Consider a more forgiving fast or moderate-fast blank if the problem persists.
I select 7-foot versus 7-foot-6 rod length separately, particularly when downward topwater strokes must clear the water or kayak rail.
Is fast or extra-fast better for live bait and popping corks?
I start with fast or moderate-fast when smooth casting and cushioning matter with live bait. Extra-fast remains possible if the particular rod suits the rig. With circle hooks, I build steady pressure by reeling rather than delivering a sharp hookset, regardless of the action printed on the blank.
I protect the bait through the cast
With shrimp, pinfish or menhaden, I prefer a smooth acceleration rather than an explosive stop-start cast. I match the complete rig to the rod and inspect bait attachment. A more yielding blank may help my casting motion, but action alone cannot promise that bait stays attached or survives longer.
I would not publish a bait-survival percentage without controlling bait species, size, condition, hooking location, handling and cast intensity. Remaining on the hook after a cast is also a different endpoint from surviving for a stated period.
My circle-hook sequence uses steady pressure
Maryland DNR’s circle-hook guidance rejects a hard pull-back hookset. Louisiana Sea Grant explains that a sharp jerk can pull a circle hook out before it engages.
I allow the bite to develop, recover line and build steady pressure. I keep the hook’s opening clear of excess bait and let the hook work. I do not transfer my jig-hook strike directly to a circle-hook rig.
For a J-hook, I use the technique appropriate to that rig and hook. I still avoid assuming that every bait presentation needs an aggressive snap.
A popping cork adds more than weight
I include cork, terminal tackle and bait in the casting payload. The leader and suspended bait also make the rig less compact than a jig of identical total mass. I check loading, tangling and tip control with the complete rig. Crisp cork pops do not justify an abrupt circle-hook strike.
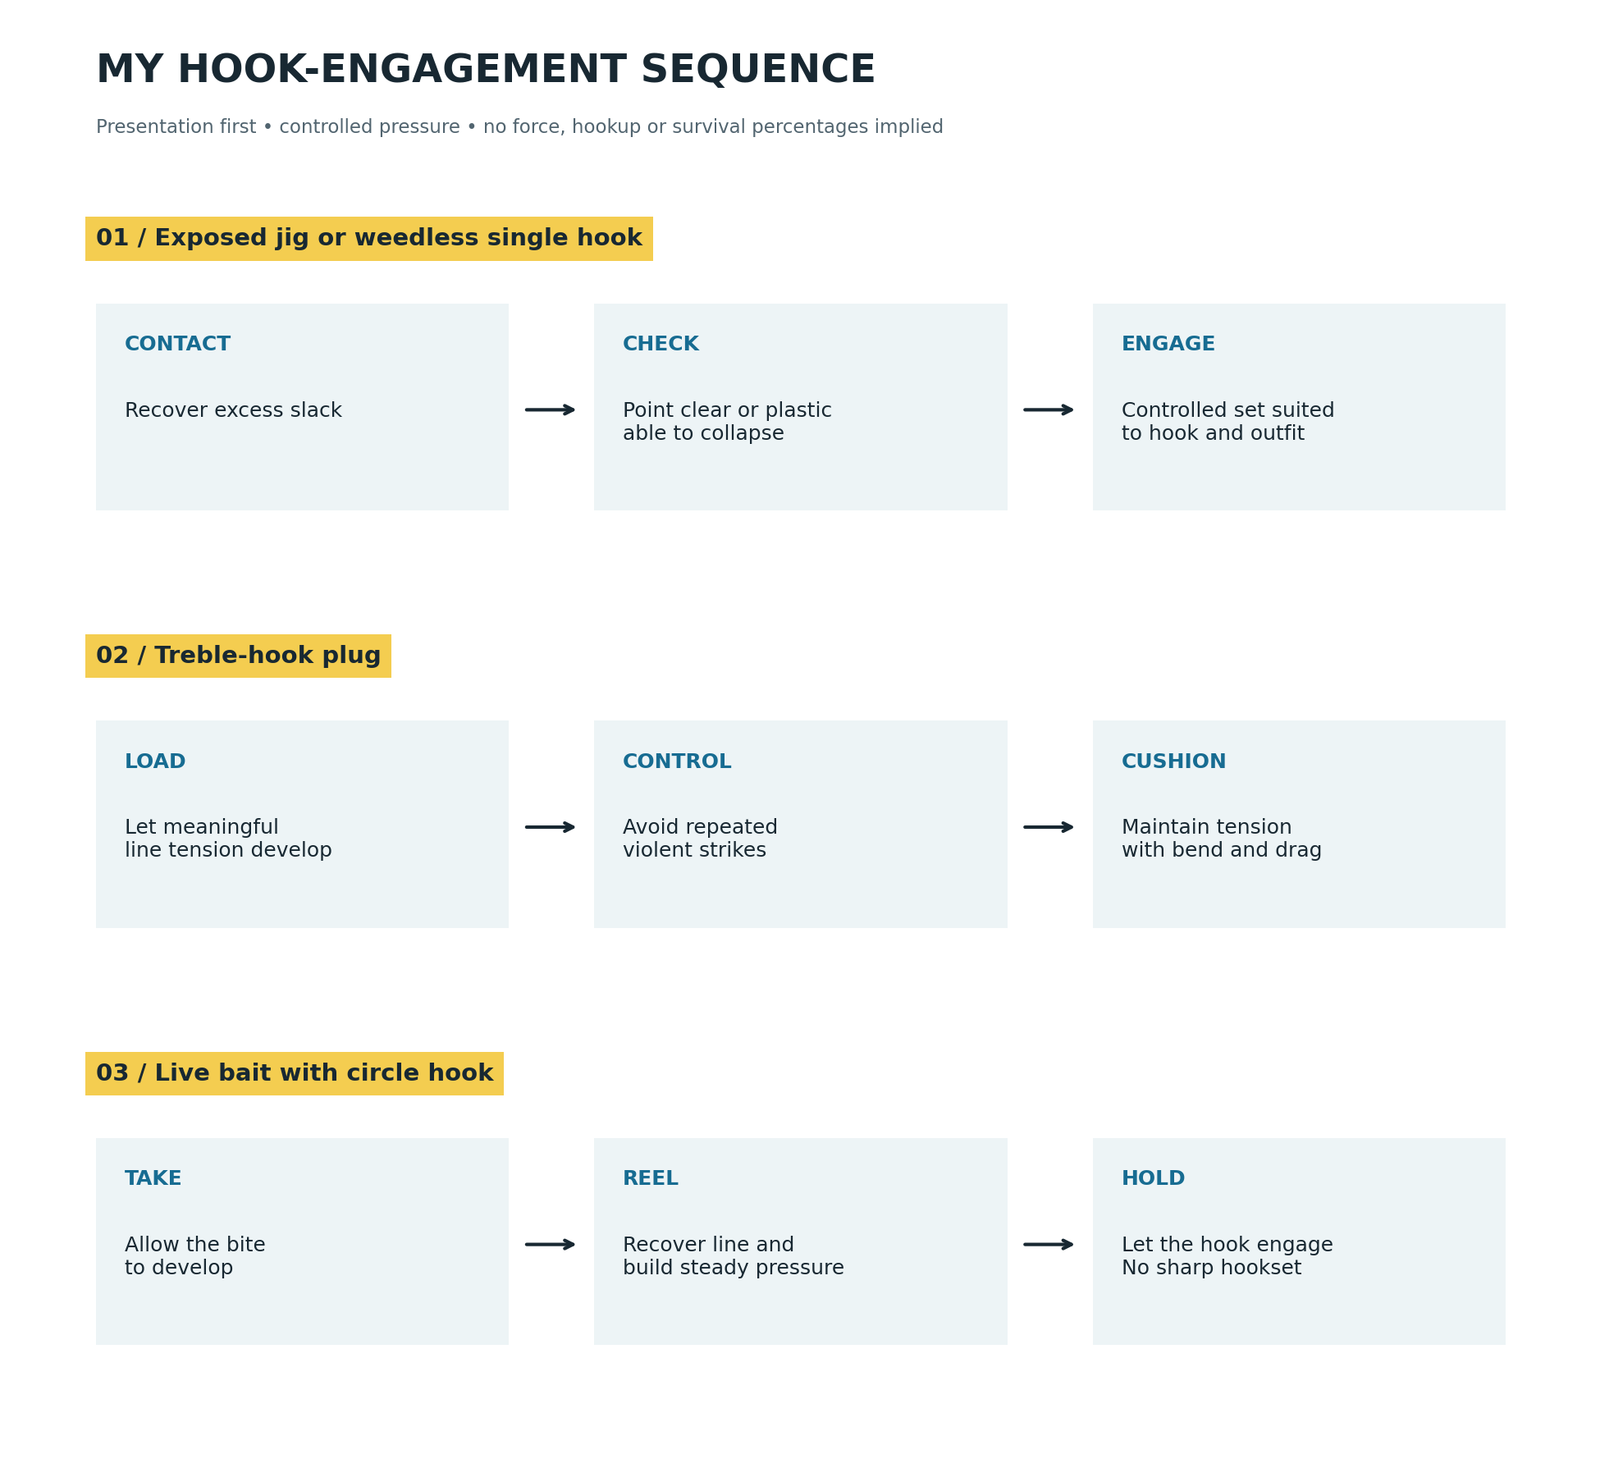
Three hook types. Three controlled sequences.
I match my response to the terminal tackle. A circle hook does not use my jig-hook strike.
Single-hook jig
I check exposure, wire gauge and plastic clearance.
- Recover excess slack.
- Check that the point is clear or the plastic can collapse.
- Use a controlled set suited to the hook and outfit.
Treble-hook plug
I balance lure control with cushioning.
- Let meaningful tension develop.
- Avoid repeated violent strikes.
- Maintain tension with rod bend and drag.
Live bait with circle hook
I build pressure without snapping the rod.
- Allow the bite to develop.
- Reel and build steady pressure.
- Let the hook engage. Do not deliver a sharp hookset.
How do braid, leader and drag change the answer?
I judge action within the complete outfit. Low-stretch braid, a short leader and restrictive drag can make a setup feel abrupt, especially near the boat. Rod bend, line elasticity, drag payout and my hand movement all influence loading. I adjust those factors before assuming a different action will solve the problem.
I avoid treating fluorocarbon as stretch-free or assigning a universal cushioning percentage to a short leader. Diameter, material, length and applied load matter. More elastic material only helps to the extent that the actual length and loading allow it to contribute.
I check drag startup as well as continued payout. My saltwater spinning reel comparison helps narrow reel choices, but I keep the same reel and spool when comparing rods.
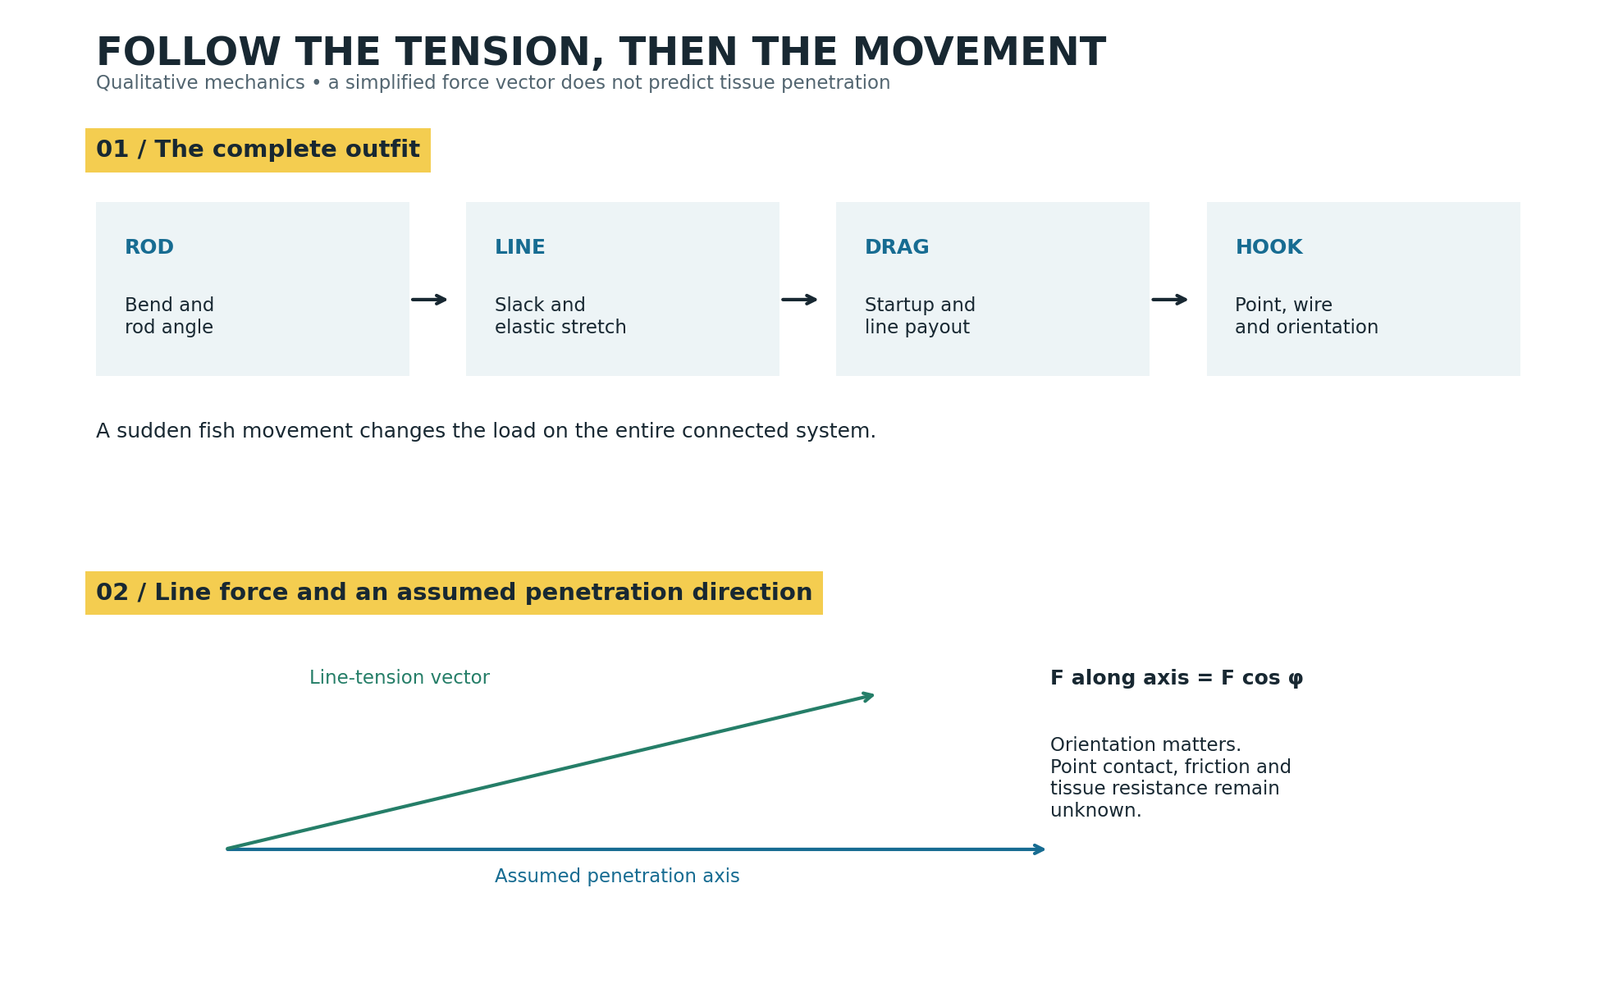
Why a force arrow is not a penetration result
For an ideal force vector, its component along an assumed penetration direction is F × cos φ, where φ is the angle between those directions. Actual hook contact is more complicated. Orientation changes, tissue resists penetration, and the point can slide or rotate.
I therefore show the force relationship without inventing a penetration threshold. I also separate line pickup from force buildup. Taking up slack does not, by itself, tell me how much tension reaches the hook.
Follow the tension through the whole outfit.
I separate line pickup from force buildup and hook penetration.
Rod and line
Bend, rod angle, slack and elastic stretch influence how loading develops.
Drag and hook
Startup, line payout, hook orientation and point condition affect the outcome.
F along an assumed penetration axis = F × cos φThe angle is between line tension and that assumed axis. Tissue resistance, contact and rotation remain unknown.
Which actual fast and extra-fast rods would I compare?
I would compare St. Croix’s Avid Inshore ASIS70MF and ASIS70MXF as useful same-series candidates. Both have the same listed length, power, line range and handle code, but their lure ranges differ. I would compare shared payloads and disclose that difference rather than call the pair an action-only experiment.
St. Croix Avid Inshore ASIS70MF: my fast-action candidate
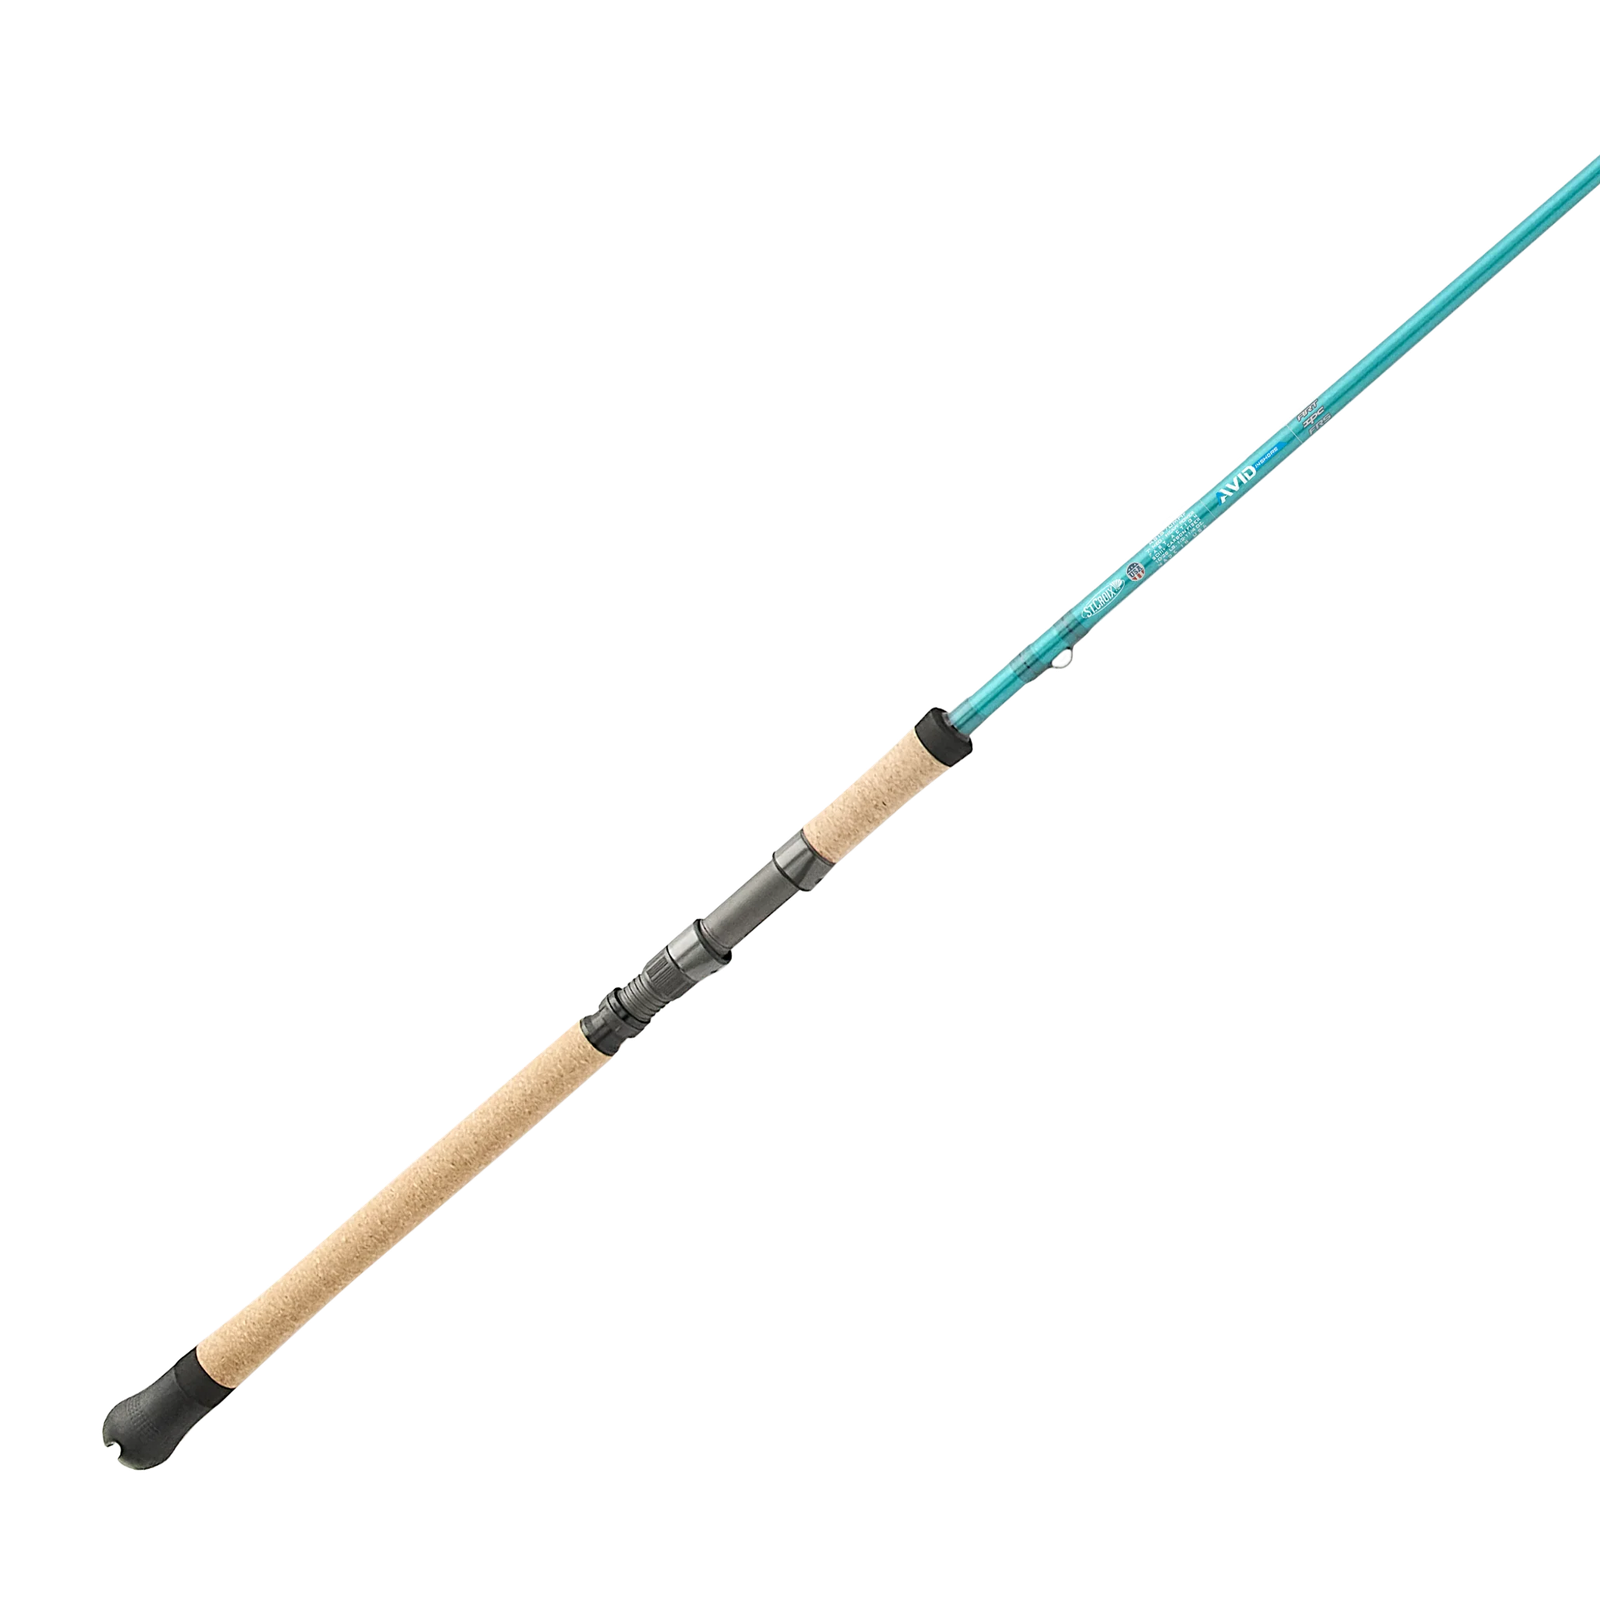
I would start here for a mixed artificial-lure comparison. My evaluation would focus on how the rod loads with my normal payload and handles both steady retrieves and controlled hops.
- My reason to shortlist: a fast-action reference within the same family.
- My limitation: I have not personally tested this model.
- My check before buying: complete lure weight, assembled balance and casting clearance.
St. Croix Avid Inshore ASIS70MXF: my extra-fast candidate
I would try this candidate when I can identify a particular contact or lure-control need. Its extra-fast label would earn a comparison, not an automatic preference.
- My reason to shortlist: a closely related alternative for a controlled comparison.
- My limitation: no verified recovery or sensitivity advantage is established here.
- My check before buying: response with a shared, weighed payload.
| Manufacturer specification | ASIS70MF | ASIS70MXF |
|---|---|---|
| Length | 7 feet | 7 feet |
| Power | Medium | Medium |
| Action | Fast | Extra-fast |
| Line rating | 8–17 lb | 8–17 lb |
| Lure rating | 3/8–3/4 oz | 3/16–5/8 oz |
| Sections / handle code | One / 2 | One / 2 |
I verified the table against St. Croix’s manufacturer page on October 19, 2026. The shared lure interval is 3/8–5/8 ounce. A fully assembled 1/2-ounce lure falls inside both ranges. The Amazon buttons open model searches, not verified offers, prices or stock. No affiliate tracking has been added.
How would I test the choice before buying?
I list my three main presentations, identify their hooks and weigh the complete rigs. Then I compare suitably rated rods with the same reel and line. I assess loading, lure control, balance and clearance separately. I choose extra-fast only if that particular rod solves a problem I can describe.
My comparison procedure is straightforward:
- Match length and power as closely as practical, then record every remaining specification difference.
- Transfer the same reel, spool, leader and lure between rods.
- Compare permitted, modest static deflection using identical support and camera positions.
- Film recovery separately, using a defined starting displacement and release method.
- Alternate casting order and record at least 20 casts per rod and shared payload as an initial comparison.
- Keep distance, target accuracy, comfort and subjective feedback as separate outcomes.
I would cover the model labels during a handling comparison when practical. I would not treat a handful of caught fish as proof of a better landing percentage.
What should I change if the outfit is not working?
I check rigging, hook condition, payload, line contact and drag before replacing the rod. Those factors can imitate an action mismatch. If the outfit still feels too abrupt, I consider a more forgiving blank. If contact work remains vague with a suitable rig, I compare exact fast and extra-fast models.
| My symptom | My first check | My next adjustment |
|---|---|---|
| Light lure barely loads the rod | Complete weight against the rating | Choose suitable power and lure range |
| Weedless hook fails to engage | Point, gap and plastic collapse | Correct the rig, then assess power and response |
| Trebles pull free | Drag, hook condition and abrupt movements | Consider forgiving fast or moderate-fast |
| Circle-hook bites are missed | Sharp striking or blocked hook opening | Build steady pressure without snapping the rod |
| Bottom contact feels vague | Slack, wind and lure contact | Restore contact before changing action |
| Bait comes off during casting | Attachment, condition and acceleration | Smooth the cast and reassess the complete rig |
When would I choose neither?
I would put moderate-fast alongside both options if my fishing revolves around treble-hook plugs, delicate bait or a preference for deeper loading. I would still match power and payload. More bend is not permission to overload a rod, and a softer feel does not excuse damaged leader or locked drag.
My answers to the remaining action questions
Does extra-fast always cast farther?
I would not assume so. Loading, payload, line, reel and release timing affect the result. I need paired measurements before assigning either action a distance advantage.
Is extra-fast automatically more expensive or better quality?
I treat action as a design choice. I assess construction, components, fit and suitability separately from the F or XF label.
Can I use extra-fast for live bait?
I can consider it if the actual rod loads the rig appropriately and permits controlled pressure. With a circle hook, I still reel into the fish rather than strike sharply.
Can two fast rods bend differently?
I expect model differences. I compare actual curves and specifications rather than treating a shared label as a measured match.
Which would I choose as my first inshore rod?
I would begin with a correctly rated fast-action rod for mixed presentations. I would choose extra-fast after identifying a specific advantage in the actual rod. If trebles or live bait dominate, I would include moderate-fast in that first comparison.